Granny-Spiration Challenge 2017 – May (Part V) / Mai (Teil 5)

Dear friends,
it's
the 1st
Saturday of May! It's time for the Granny-Spiration Challenge!
Let's
start with sharing some data about the last Challenge:
- Susanne Shumate was our winner of the yarn. Congratulations!
- Our top three link ups:
- Garland from Hip en Kleurig (see here)
- Granny Bunny from EssSpecially (see here)
- Beach Ball Square from Stitches n Scraps (see here)
- the May link up will open on the 5th at 12pm EST, and run through 11:55am on Thursday, May 18th.
- the giveaway will be three crochet patterns to three winners sponsored by Helena from her Rhelena Etsy Shop
Join
us at the Granny-Spiration Challenge following this link!
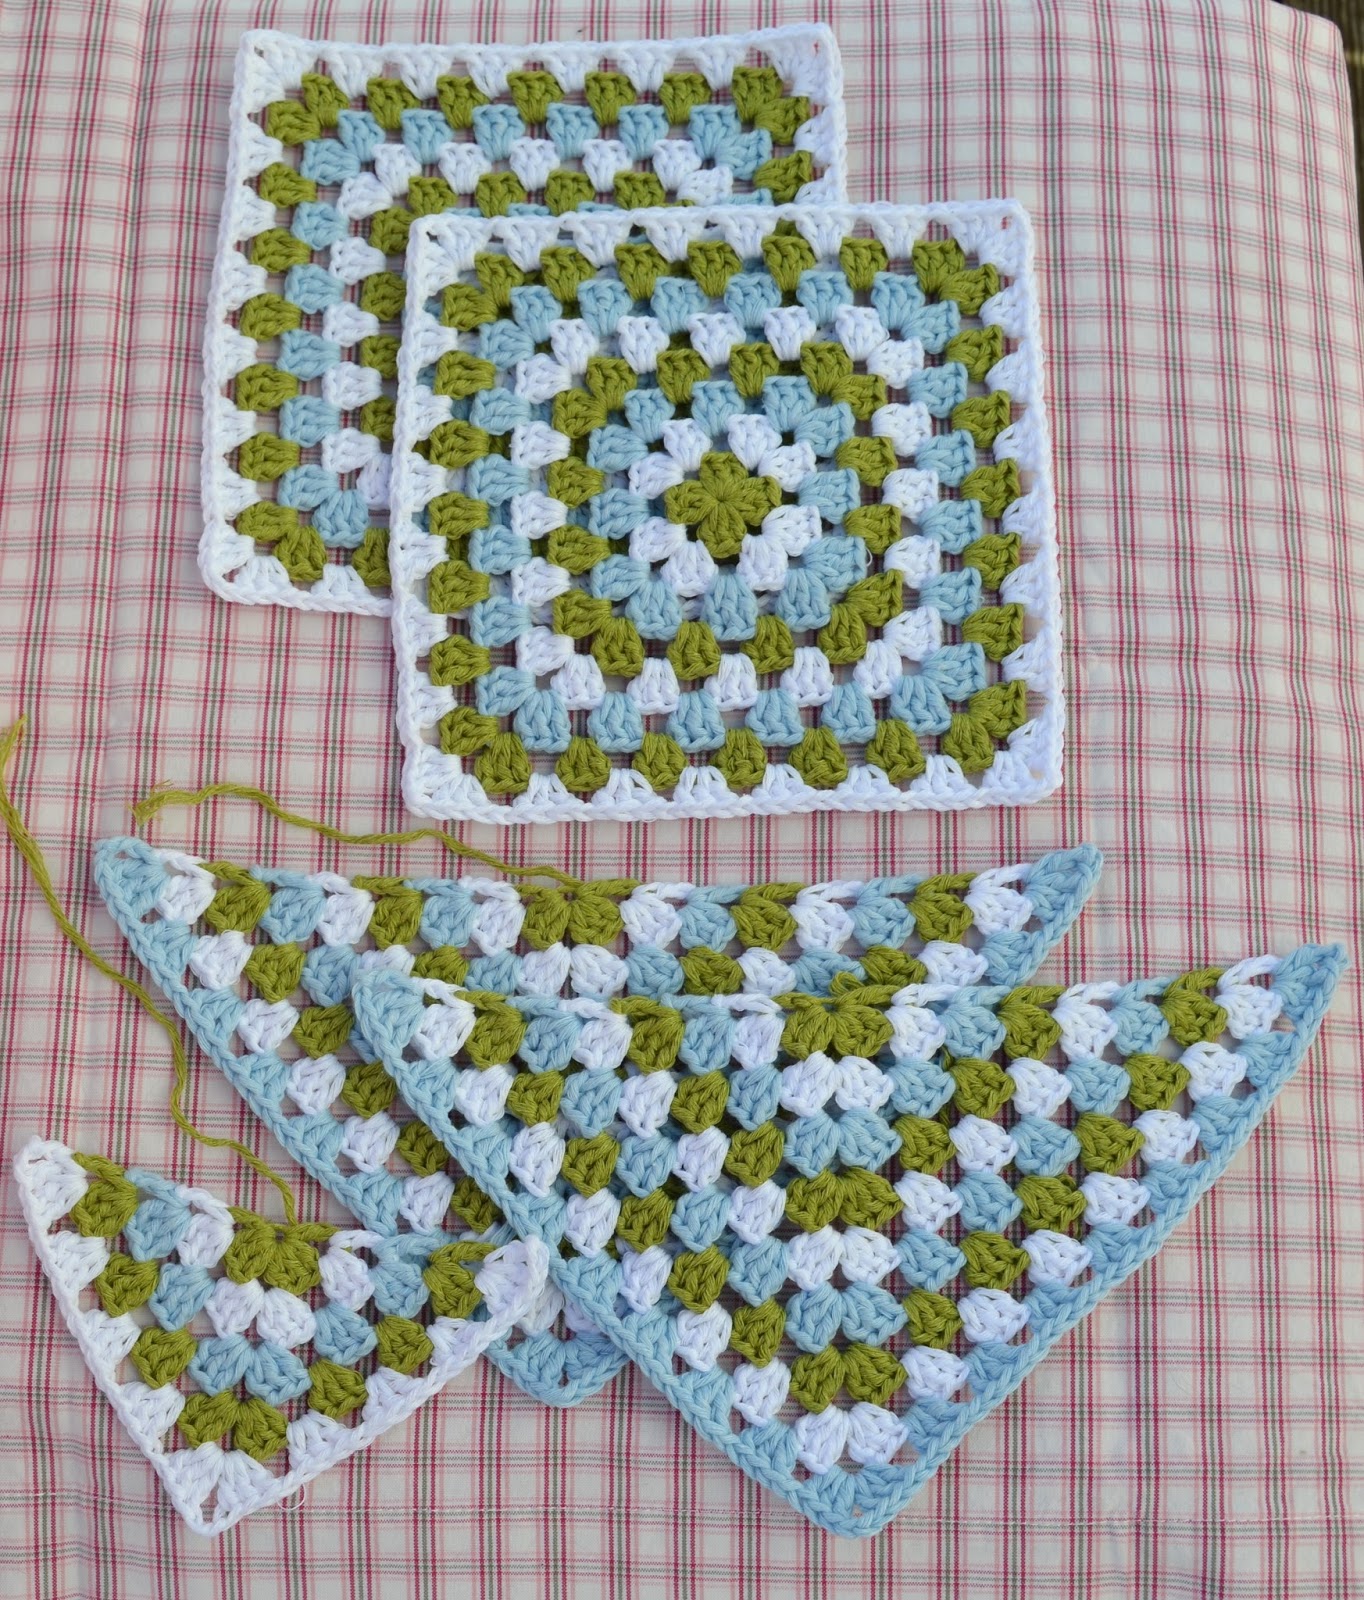
And that's what I made for this month's Challenge:
Summer
Holiday Granny Bag
Frankly
said, I was pretty late with starting a project for this Challenge.
Happily crocheting one shawl after another I somewhat forgot making
anything else. The 6th
of May always seemed miles away, even on the 3rd
– that's when I finally got started...
You
know I've made up my mind to work solely with basic grannies (at
least as long as possible) and all of the sudden I couldn't think of
anything extra-ordinary made out of the traditional granny square.
Right – I could have looked into my brainstorming-book, but this
didn't even cross my mind. Lucky me I came across the Urban GypsyBoho Bag on pinterest!
And
this is my version: TA-DAH!!

Yesterday
I even started version N°2...

If
you'd care for making a Summer Holiday Granny Bag too, just follow
the instructions:
Start with two “normal” grannies and two half grannies. You'll also need a third, slightly smaller half granny.
Using
the “join-as-you-go”-methode join the two "normal" and the two larger half grannies together.

Start
with the edge around the top.

Take
the last half granny on which you've made a loop that fits around the
button. Crochet the half granny onto the border.

Eventually
include the handles too.
Sew
the lining, sew the lining into the bag, make a tassel and sew that
to the tip of the bag: DONE!!!

I'll
keep in touch!
P.S.:
Next Granny-Spiration Challenge is on the 3rd
of June!
P.S.2:
Do have a look at what the other hosts made:

Liebe Freunde,
es
ist der erste Samstag im Mai, d.h. höhste Zeit für die fünfte
Ausgabe der Granny-Spiration Challenge!
Erst
ein paar Daten zum letzten Challenge (April):
- Susanne Shumate war die glückliche Gewinnerin unseres Preisausschreibens. Herzlichen Glückwunsch!
- Unsere drei Meistbesuchten:
- Slinger von Hip en Kleurig (hier zu sehen)
- Granny Bunny von EssSpecially (hier zu sehen)
- Beach Ball Square von Stitches n Scraps (hier zu sehen )
Wissenswertes
zur jetzigen Ausgabe :
- der Link bleibt geöffnet bis zum 18. Mai.
- das Preisausschreiben wird von Helena gesponsert. Drei Gewinner bekommen jeweils drei Anleitungen aus ihrem Etsy Shop! Und nicht vergessen: Nur wer sich beim Preisausschreiben anmeldet, kann gewinnen!
Daher
schnell diesen Link folgen!
Nun
zu meinem Beitrag:
Sommerurlaub
Granny Tasche
Genaugenommen
bin ich recht spät mit dem Projekt für die Mai-Ausgabe angefangen.
Ich war dermaßen in Schal-Laune, dass ich darüber alles andere
vergaß. Darüber hinaus war es bin zum 6. Mai ja sowieso noch
eeeewig hin - sogar noch am Abend des 3. Mai, als ich dann endlich
anfing...
Ich
habe mir ja vorgenommen, so lange wie nur eben möglich nur auf die
traditionellen Granny Squares zurückzugreifen.
Nur wollte mir urplötzlich so absolut gar nichts originelles
einfallen, was ich aus Grannys machen könnte. Klar, ich hätte mal
in meinem schlauen Büchlein schauen können, in dem ich meine Ideen
gesammelt hatte, aber daran habe ich gar nicht gedacht. Zum Glück
stolperte ich bei Pinterest über die „Urban Gypsy Boho Bag”.
Und
hier ist nun meine Version:
Gestern
Abend bin ich dann auch noch eine zweite angefangen...
Und
für den Fall, dass Ihr auch gerne so eine tolle Sommerurlaubstasche
hättet, einfach diese Anleitung folgen:
Ihr
braucht zwei normale Grannys, zwei halbe Grannys und ein weiteres,
etwas kleineres halbes Granny.

Die
normalen Grannys werden auf der „join-as-you-go“ mit den halben
zusammengehäkelt.

Dann
oben herum eine Borte häkeln.

Nun
kommt das dritte halbe Granny ins Spiel. An der Spitze eine Schlaufe
häkeln, durch welche der Knopf passt. Nun das Granny mit an den Rand
häkeln.

Ggf.
auch die Taschenhenkeln anhäkeln.
Futter
passend zuschneiden und nähen, Futter einnähen, Quaste machen und
annähen UND... FERTIG!!!

Ich
halte euch auf dem Laufenden!
P.S.:
Das nächste Granny-Spiration-Treffen ist am 3. Juni!
P.S.2:
Schaut euch an, was die anderen gemacht haben:


Beautiful spring colours that match the season! These bags are just lovely and they are lined too! Clever you!
AntwortenLöschenThank you very much, dear Sandra!
LöschenThe bags did need a lining as thing could slip through the holes.
Have a great Sunday,
Marjan
You've made a lovely and useful use of those granny squares because the bags are just perfect!
AntwortenLöschenThank you, dear Maya.
LöschenThe bags are a bit small - just the right size for when one's on a summer holiday...
Have a great Sunday,
Marjan
I love it, such a smart idea! The tassel is the perfect finishing touch!
AntwortenLöschenWishin you a quiet Sunday ;-)
Thank you, dear Sigrid.
LöschenThe garden is a ruin but the hole is filled again. I mght start replanning the garden any time soon - new plants, new shrubs,...
Have a lovely Sunday too!
Marjan
Hallooooo meine liebe Marjan,
AntwortenLöschenbin wieder zurück und komme gar nicht mehr aus dem Staunen raus, was du alles soooooo zauberhaftes wieder gehäkelt hast!
Deine Tücher sind einfach wunderschön......tja.....meine Häkelnadel ist noch warm :-) du verleitest mich immer und immer wieder! Hab taudend Dank auch für die tollen Anleitungen! Ich drück dich lieb aus der Ferne!
Herzensgrüassli
Yvonne
Welcome back, liebe Yvonne!!!
LöschenIch hoffe, du hattest eine schöne Reise. Tja, es hat sich wieder einiges angesammelt - und ich habe noch nicht mal die Hälfte davon gepostet... Du kannst dich auf noch einige Anregungen freuen!
Von Herzen einen schönen Sonntag,
Marjan
Liebe Marjan,
AntwortenLöschendie Grannytaschen sind zauberhaft. Was für eine tolle Idee, mit der Spitze unten und der Quaste dran - dass gefällt mir ganz wunderbar.
Vielen Dank fürs zeigen und die Inspiration, wirklich toll...
Liebe Grüße von der Insel Rügen, MAndy
Vielen Dank, liebe Mandy.
LöschenOhne den Quasten wären die Taschen nicht halb so schön. Genaugenommen könnten sie noch ein wenig mehr vetragen, aber vorerst werden sie wohl so bleiben, wie sie sind...
Schönen Sonntag wünsche ich dir!
Marjan
Tolle Idee! Wirklich eine hübsche Tasche!
AntwortenLöschenLiebe Grüße,
Sandra
Vielen Dank, liebe Sandra!
LöschenIch wünsche dir einen schönen Sonntag,
Marjan
sehr sehr schön :-)
AntwortenLöschenlg anja
Danke schön!!
LöschenLiebe Grüße,
Marjan
Lovely Summer bags !!!
AntwortenLöschenHave a nice week !
Anna
Thank you very much, dear Anna!
LöschenHope your week will be great too!
Marjan
Wieder hast Du gezaubert , liebe Marjan, die Täschchen sind ja hinreissend schön in den Farben sowie vom Design !!!Danke für die Anleitung ! Ich wünsche Dir eine angenehme Woche . Sei lieb gegrüßt von Carmen
AntwortenLöschenVielen Dank, liebe Carmen!
LöschenIch wünsche dir eine gelungene Woche,
Marjan
They look fabulous! Thank you for sharing :).
AntwortenLöschenThank you very much!
LöschenHave a great week,
Marjan
....wunderschön!!
AntwortenLöschenLiebe Grüße, Manja
Vielen Dank, liebe Manja.
LöschenIch wünsche dir eine schöne Woche,
Marjan
What a cute little bag.
AntwortenLöschenThank you very much!
LöschenThis is so darling!
AntwortenLöschenThank you very much!
LöschenŚwietne torebki, ładne kolory i pięknie wykończone, cudowne! Pozdrawiam, Krista :)
AntwortenLöschenDziękuję bardzo, kochana Krista!
LöschenMiłego dnia,
Marjan
Marjan, I always love the way you coordinate your crochet with fabrics. Pity I have no sewing skills at all, and my only option for a bag lining is to cut and fit a plain pillowcase.
AntwortenLöschenThese are such stylish bags - You're amazing for putting them together in just a few days! I wish I had your super-powers. ;)
Happy Crocheting!
No super-powers involved, dear Jenny. Just a N°4 hook, a rather chunky yarn and an idea and it were but 9 grannies...
LöschenHave a great day,
Marjan
They turned out beautiful, perfect for spring and summer! Thank you for sharing at The Really Crafty Link Party. Pinned!
AntwortenLöschenThank you very much, dear Teresa!
LöschenI love anything made with a granny square. these are so lovely.
AntwortenLöschenThank you very much, dear Julie!
LöschenHave a lovely Sunday,
Marjan
Hi Marjan, just to let you know your lovely bags are one of the features at this weeks Handmade Monday - congrats.
LöschenAWESOME! Thank you once again, dear Julie!
LöschenHave a great week ahead,
Marjan
Love it thanks for sharing!
AntwortenLöschenThank you very much, dear Kirstyn!
LöschenThese bags are sooooooo cute! I especially like the blue and green one! And more than your inspiration, but goes to show the great variety that can be by a simple square :) Pinning for later. Just love them!
AntwortenLöschenAlexandra
EyeLoveKnots.blogspot.com
The blue/green one is my favourite too. They're a bit too small for daily use, but great otherwise...
LöschenMarjan I love the color combinations you have chosen for this project. They take me back to the seventies! As do the cute bags. I remember I had always wanted one of these when I was a teen to go with my boho look.
AntwortenLöschenThank you very much, dear Mary!
LöschenGuess that means: No boho look anymore now...
Have a great weekend,
Marjan
Huch, wie konnte ich das denn übersehen! Die Täschchen sind ja ein Traum!! ♥ Wunderschön gemacht, auch die Farbkombis sind prima. Vielen lieben Dank für die Anleitung! LG Nata
AntwortenLöschenVielen Dank, liebe Nata!
Löschen